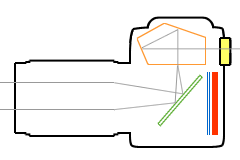
A Digital Still Image Camera uses a single lens reflex mechanism. It is a digital camera that uses a mechanical mirror and Penta-Prism to direct light from the lens to an optical viewfinder on the back of the camera.
The mirror reflects the light coming through the attached lens upwards at a 90-degree angle. It is then reflected three times by the roof of the Penta-Prism, rectifying it for the photographer’s eye. During exposure, the mirror assembly swings upward, the aperture narrows and a shutter opens, allowing the lens to project light onto the image sensor. A second shutter then covers the sensor, ending the exposure, and the mirror lowers while the shutter resets. The period that the mirror is flipped up is referred to as ‘viewfinder blackout’. A fast acting mirror and shutter is preferred so as to not to delay an action photo.
In simplified words:
- Light passes through the lens and strikes a mirror. (GREEN)
- The mirror reflects the light up to a focusing screen.
- Light passes through the focusing screen and enters a block of glass called a Penta-Prism. (ORANGE)
- The Penta-Prism reflects the image so that you can see it in the viewfinder.
- When we take a photo, the mirror (GREEN) flips and a shutter (BLUE) opens up, that exposes the digital sensor (RED) to light.
Figure 1.1 explaining the single lens reflex mechanism.
Other Features of DSLR Camera:
- With a DSLR Camera, you see exactly what the lens sees.
- You can change the lens on a Digital SLR.
- Digital SLRs have a large image sensor that produces high quality photos.
- An SLR has a near zero lag time, and is ideal for action photography.
EXPOSURE TRIANGLE
Aperture, shutter speed, and ISO work together to determine the exposure of your photo. When set to auto, your camera decides the best values for the three settings based on current lighting conditions. But once you know what each means and how it affects the image, you can tweak the settings to fit your purpose. Each of the three aspects of the triangle relate to light and how it enters and interacts with the camera.
Each Side of the triangle represents an “Ingredient” in the amount of light contributed to overall exposure of a given scene. The longer the side of the triangle, the more the light will get contributed. If you increase or decrease the length of one side of the triangle, you must equally or decrease the length of the other side respectively. Else split the change proportionately between the other two sides.
Shutter Speed
Shutter Speed is the Duration of the curtain being opened in front of the camera sensor. The effective length of time a Camera’s Shutter is open, which also helps in determining the amount of light that reaches the Film or Sensor.
One of the effects of Shutter Speed is Brightness and Darkness. The longer the Shutter is open the more the light will get inside to reach the sensor. But if we shorten up the time duration of the Shutter blink, less amount of light will get in resulting in a bit darker images.
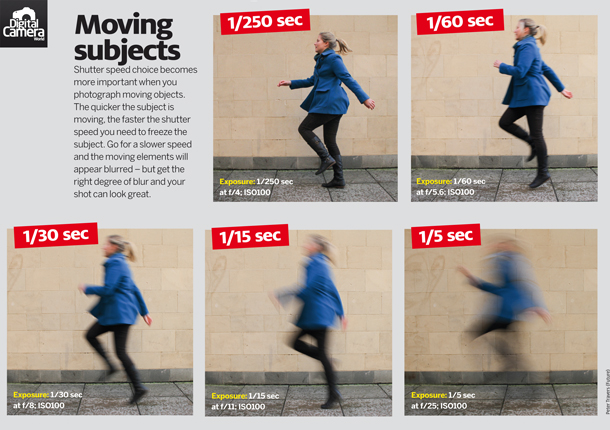
Another effect of Shutter Speed is motion Blur. The longer the Shutter is open, the more will be the amount of motion blur in the shot. As the image sensor looks at the scene (that we are attempting to capture) for a longer period of time.
Shutter Speed is measured in seconds or in most cases fractions of seconds. Like: 1/1000, 1/500, 1/250, 1/125, 1/60, 1/30, 1/15, 1/8 etc. The bigger the denominator the faster the speed will be, i.e. 1/1000 is much faster than 1/30.
Also if we notice the Shutter Speed Stops available to us on our cameras, we will find that the amount of Shutter Speed is getting double (Approximately) with each stop. This doubling is handy to keep in mind as aperture settings also double the amount of light that is let in – as a result increasing shutter speed by one stop and decreasing aperture by one stop should give you similar exposure levels.
Mostly we will be using Shutter Speed of 1/60th of a second or faster. As anything slower than this might cause a terrible camera shake, resulting in blurry and hazy pictures. If we want to capture something with slower Shutter Speed we will require either a tripod or some type of image stabilization method.
Aperture
Aperture is the size of opening in the lens through which light travels and hits the sensor, when the picture is taken. When we click the Shutter Release button of our camera a hole opens up that allows our Camera’s Image Sensor to capture the scene. The setting of the Aperture is actually the setting of the size of that hole. Larger hole will let a big amount of light to get in while a smaller one will allow the lesser amount of light.
F-Stop is the measuring unit for Aperture in our Cameras. A single shift in the F-Stop value will doubles or halves the amount of opening in our Lens, which also doubles or halves the amount of light that gets in. We should also keep in mind that the smaller F-Stops will result in Bigger Apertures and Vice-Versa, i.e. f/2.8 is in fact much larger aperture than f/22.
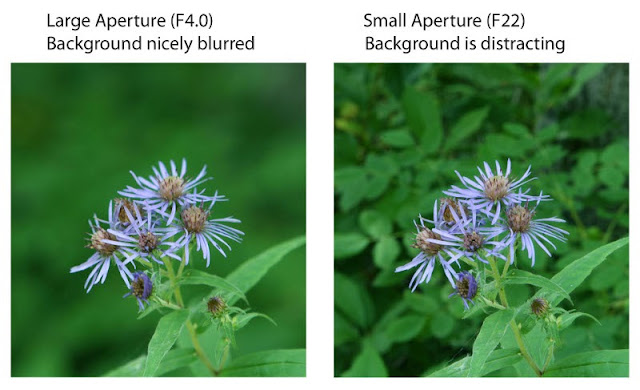
The side effect of Aperture is called Depth of Field. Depth of Filed determines the amount of the scene in Focus. Large Depth of Field means a large amount of scene will be in Focus whether it’s close to the camera or far away. Small or shallow Depth of Filed means that only a part of the scene will be in focus and the rest will be blurry or fuzzy.
Smaller Aperture settings are used in most of the Landscape Photography. Which ensures that from the foreground to the horizon is relatively in focus.
Large aperture is used in order to get a Shallow Depth of Field during Portrait Photography and Macro Photography. It is very handy to have the main subject perfectly in focus but to have a nice blurry background. This ensures that the subject is the main focal point and other objects in the shot are not distracting.
ISO
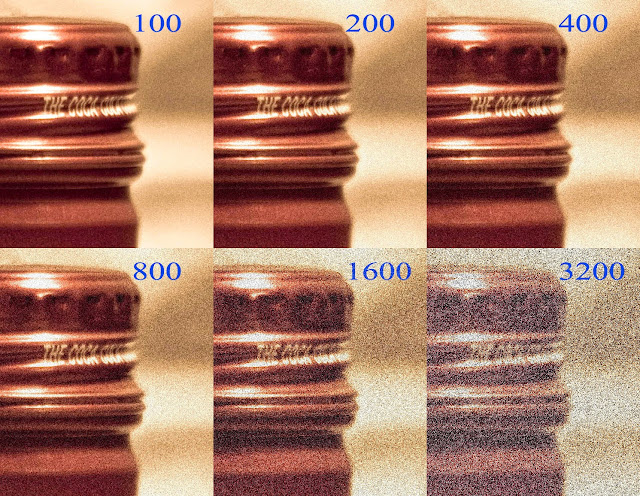
ISO measures the sensitivity of the image sensor. Lower value of ISO will make your camera less sensitive to light and finer the grain. Higher ISO leads to a faster shutter speed and is ideal for darker scenarios, but on the cost of noisier shots.
If there is plenty of light, we want little grain, we are using a tripod and our subject is stationary we will generally use a pretty low ISO rating. The normal ISO value is usually considered to be 100 which will give us lovely crisp and noise free shots in day light.
However if it’s dark, we purposely want grain, we don’t have a tripod and/or our subject is moving we might consider increasing the ISO as it will enable me to shoot with a faster shutter speed and still expose the shot pretty well. We can increase the ISO up to 6400 depending upon the quality required for that shot.
How to set these three Variables during different scenarios
Automatic Mode: A fully Automatic mode which will adjust the Shutter Speed, Aperture and ISO itself according to the requirement of the scene.
P Mode: Automatically adjust the settings of the camera according to the scene requirements except the Flash settings.
S Mode: Shutter priority mode will give us the control to adjust the length of the Shutter Speed. And the camera will adjust the aperture itself depending upon the requirements of the scene. This will help us in getting Properly Exposed Pictures. This mode is preferable when we need a long exposure of a moving light or if we need to capture a static pose of a very fast moving object.
A Mode: Aperture Priority Mode is where we get the control over the Aperture settings. And the camera will automatically adjust the Shutter Speed for you. Suitable to capture the dreamy look in a portrait, with a very blurry background, by setting the aperture to a very lower value let’s say F1.8. Or if we want to capture the land scape we will increase the aperture to a very high value like F16.
Manual Mode: Manual Mode will give us control over the Shutter Speed as well as the Aperture. This is ideal if we are capturing night landscapes on a Tri-Pod, as we can adjust the Exposure triangle to higher values so that we can get maximum brightness through our camera.
Digital SLR Technical Terms
Mega-pixels: Cameras with more mega-pixels give you the freedom to make huge prints and to crop your photos, but they do not necessarily have higher image quality.
Dust Control: Dust that lands on an SLR sensor appears as small black spots in every photo you take. Dust control systems attempt to prevent and eliminate this.
Image Stabilization: There are two types of stabilization: one that’s included inside the camera and one that’s inside the lens. Regardless of the type, stabilization helps to eliminate blur in your photos caused by camera shake.
Live View: With a Live view system, you can compose photos using the LCD screen on the back of the camera in addition to the viewfinder.
Dynamic Range: Your eyes have exceptional dynamic range and can see details in a scene even when there’s extreme contrast. For that a DSLR requires a unique Dynamic Range function.
HDSLR: An HDSLR is a single camera that can capture both still images and High Definition (HD) video.
Crop Factor: A digital SLR sensor is smaller than a frame of 35mm film, so only a portion of the image that passes through the lens is captured by the sensor.
Continuous Drive: A continuous drive lets us take multiple photos in rapid succession. More expensive cameras have faster continuous drives.


